Translate
Monday, 19 April 2021
Sweet Poppy stencils. The craft store show April 2021
Thursday, 15 April 2021
Stargazing Foxes
Hello everyone.
Welcome to the Lavinia stamps extravaganza.
A Fabulous few days
ahead with lots of exciting things happening, prizes to be won and great
inspiration from the design team.
Stargazing Foxes
The Products that I used, were…
New stamps
Tree of Courage, Tree of hope.
Stargazing Foxes.
Distress oxide colours needed for background.
Tumbled glass, mermaid lagoon, salty ocean and faded jeans.
Using an 18 cm square piece of multifarious card, and Starting with tumbled glass and makeup brush ink up centre of card in a circular motion.
Using salty ocean ink up from edge of card towards
centre, leaving a light area in the centre.
Once happy with this, repeat process with mermaid
lagoon, leaving both colours showing in the centre.
Repeat twice more using salty ocean followed by
faded jeans, you will have a circular pattern with all four colours showing.

Line up the tree of courage and the tree of hope
stamps on your background, I used a stamping platform so I could stamp both
together using acorn versafine Clair ink.
I then repeated the same process with the foxes, also using acorn ink.
Repeat this process once more with Brodwin using onyx black versamark ink.
Place a piece of torn paper over background, then
ink base of card with faded jeans to ground trees and foxes.
Using a soft lead pencil gently rub pencil on the
area where you want the shadow to be, then Rub with a soft cloth to blend into
the background.
For the next step place a small piece of low tack
tape at base of the trees. Then stamp vine at base of trees using shady lane
versafine Clair ink.
Using small dots on a small acrylic block Kaleidacolour
pastel ink stamp onto the area under the
trees and foxes to give the look of little flowers
Using versamark and stars2 miniature randomly stamp stars in background then using soft paintbrush highlight with Lavinia gold mica minerals.
Mat onto black and white layers then frame or mount onto blank card.
I hope you enjoy following along to this
step-by-step guide. Please share your creations as I would love to see them
Take care, stay safe.
Rosemary
Lilium flower card and tag
Sharing a step by step for Lavinia stamps.
I hope you are all having fun and enjoying the new stamps,
they are fabulous,
Good luck with the competitions.
Enjoy they fabulous samples, videos and step by steps that
the design team have done to inspire you.
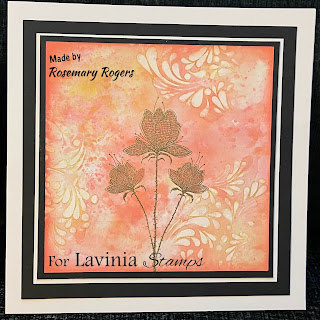
Lilium Flower card and tag.
Products used for this project.
Lilium set Magic
surrounds us words
Step 1.
I had a piece of multifarious card measuring 24 x 15 cm, I cut the card to a 15cm square, and decided to use the smaller piece as a gift tag.
Press all 3 colours onto mat then spray with water, spray a little water onto card then press card into the ink, lift the card dry with heat tool.
Place feather leaf Stencil onto card, then using white
acrylic paint and small sponge, gently tap paint onto card and tag, do this in
a couple of random areas, allow to dry.
Using a stamping platform, rub card with powder then stamp
larger Lilium flower using versamark, then heat emboss with gold embossing
powder, repeat either side of large flower with the smaller flowers. Stamp a
single Lilium flower on the tag.
Using an acrylic block and versamark ink stamp Magic
surrounds us words stamp, then rub gold mica powder over image with a soft
brush. Leaves a faint shiny effect on the card. Repeat on tag.
Matt and layer the square topper onto black and white card, then frame or mount onto 8 inch greeting card. Cut out desired tag shape then mount onto a larger black tag shape. Punch hole in centre and thread ribbon or string through.
Look forward to seeing all your beautiful creations with the
new stamps.


